How to connect your domain to Lumafy
Your domain stays in your Cloudflare account. Three ways to choose from: give us a key to DNS only, import a file with the records, or add the records by hand.
How it works
Your domain stays yours and lives in your own Cloudflare account. We never ask for a password or get access to your account. Your domain needs a few DNS records: two CNAME records (they send visitors to the site) and a few TXT records (they prove the domain is yours and get the HTTPS certificate). We send the records for your domain separately, by Telegram or e-mail. Choose the way that suits you; the result is the same.
It takes 10–15 minutes. Cloudflare's free plan is enough. If your domain is not on Cloudflare yet, start with "If your domain is not on Cloudflare yet" at the bottom of the page.
You create a key, we add the records
An access key (API token) can only change the DNS records of your one domain. You send it to us, and we add and check the records ourselves.
- Sign in at dash.cloudflare.com, open the profile menu at the top right → Profile → API Tokens (or go straight to dash.cloudflare.com/profile/api-tokens) and click Create Token.
- Token name: for example
Lumafy DNS. - Under Policies, choose the Edit zone DNS template. Click the pencil next to the policy and in the Include → Specific zone row choose your domain. Only DNS → Edit should be ticked.
- Token expiration:
7 days. After a week the key stops working by itself. - Click Continue to summary, then Create Token. Copy the key: Cloudflare shows it only once.
- Send the key to us by Telegram or e-mail and say which domain it is for. Once we confirm we have it, you can delete the message.
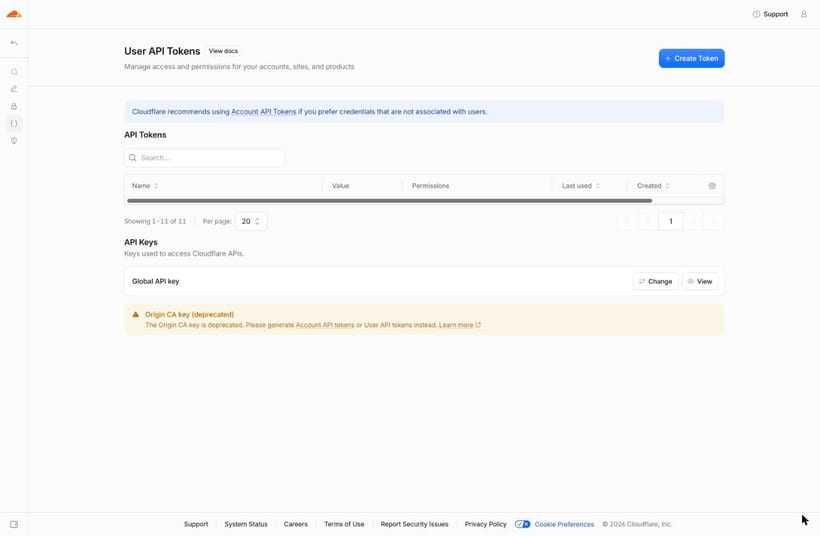
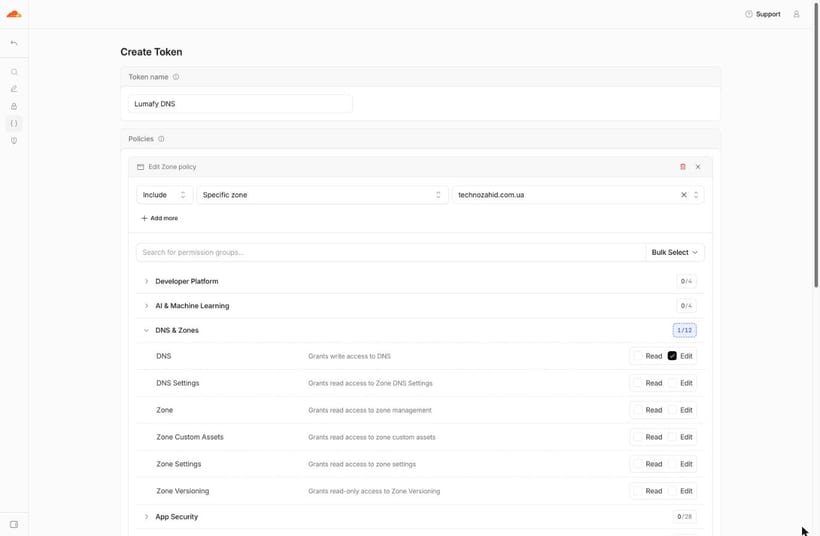
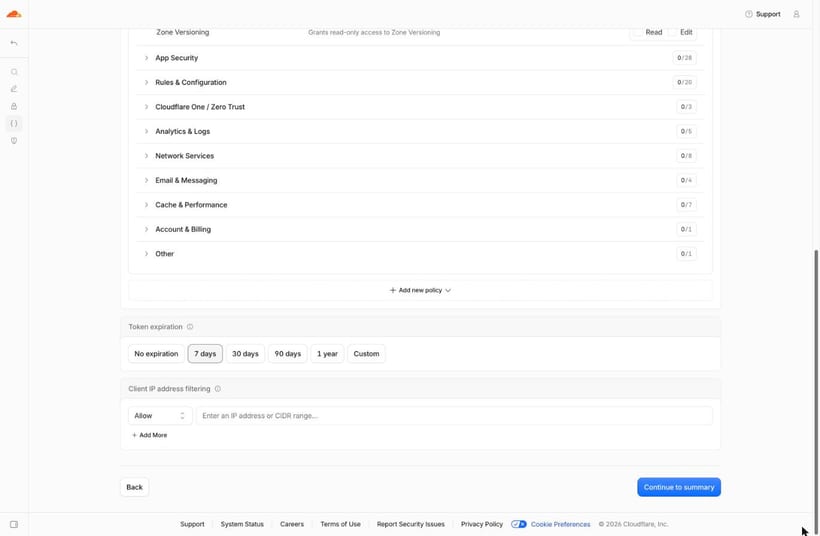
This key gives no access to your account, billing or other domains, only to the DNS records of this domain. We add only the site's records and leave mail and other records alone. If the domain already has an old site, we first tell you which of its records we will replace. When the site works, delete the key: API Tokens → the three dots next to the key → Delete.
Step 1. Open the DNS records
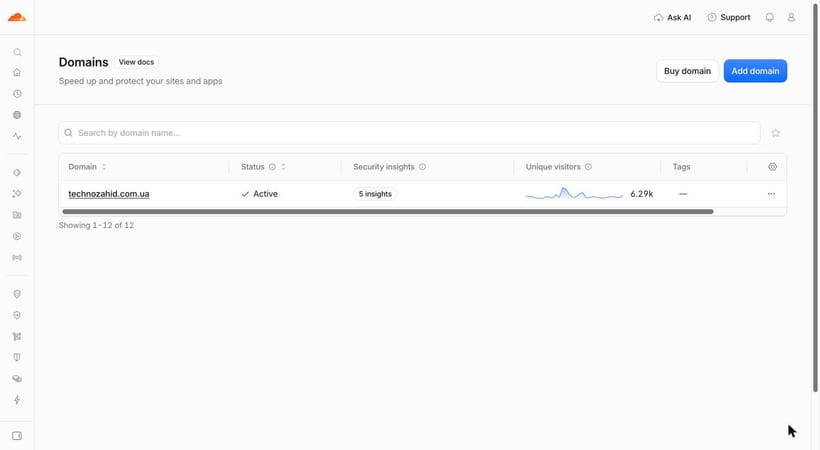
Sign in at dash.cloudflare.com, pick your domain in the list, then DNS → Records in the menu on the left.
Step 2. Import the file from us
We send a file with the records, for example your-domain.dns.txt.
- First delete the old A, AAAA or CNAME records of the domain itself (Cloudflare shows the domain itself or
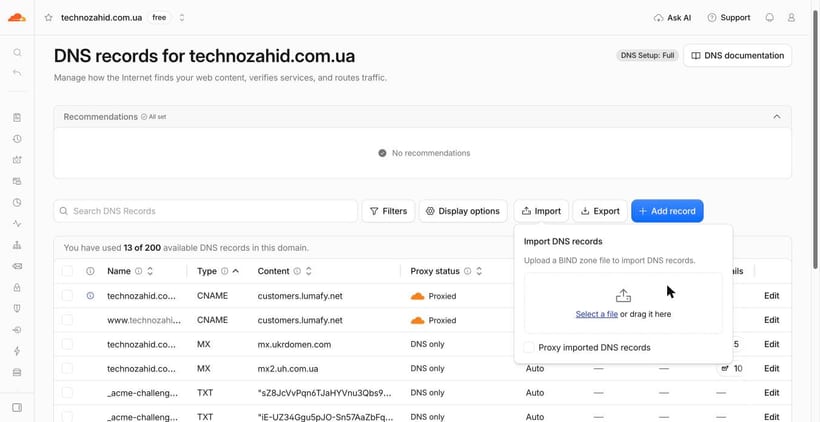
@) and ofwww, if there are any. They lead to the old site: note their values or take a screenshot. Leave the mail records alone. - On the DNS → Records page, click Import.
- Tick Proxy imported DNS records.
- Click Select a file and choose the file from us.
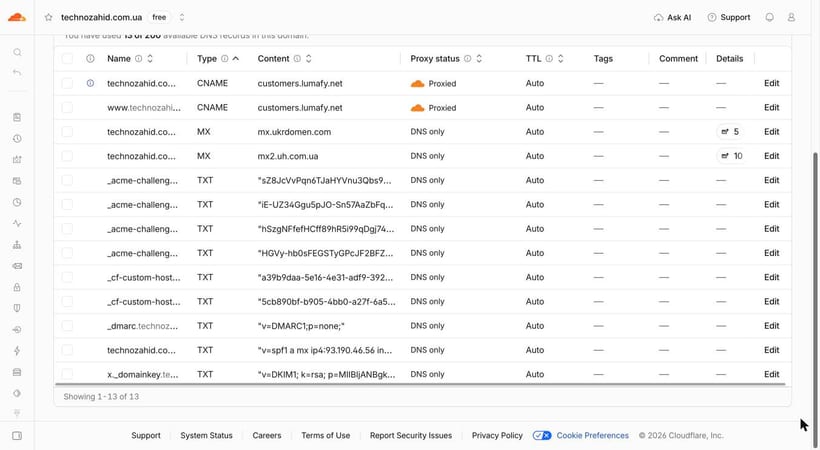
- Check that the list now has two CNAME records to
customers.lumafy.netwith the orange cloud and a few TXT records.
If the import fails, add the records by hand (the "Add by hand" tab).
Step 1. Open the DNS records
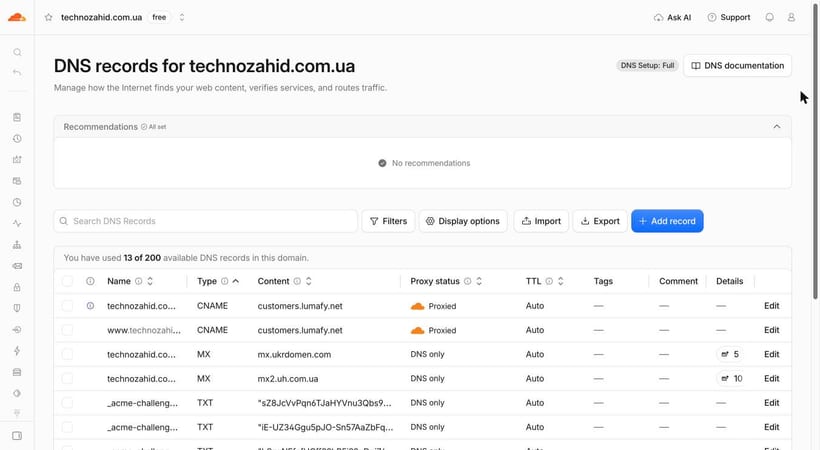
Sign in at dash.cloudflare.com, pick your domain in the list, then DNS → Records in the menu on the left.
Step 2. Add the TXT records from our table
For each row of the table:
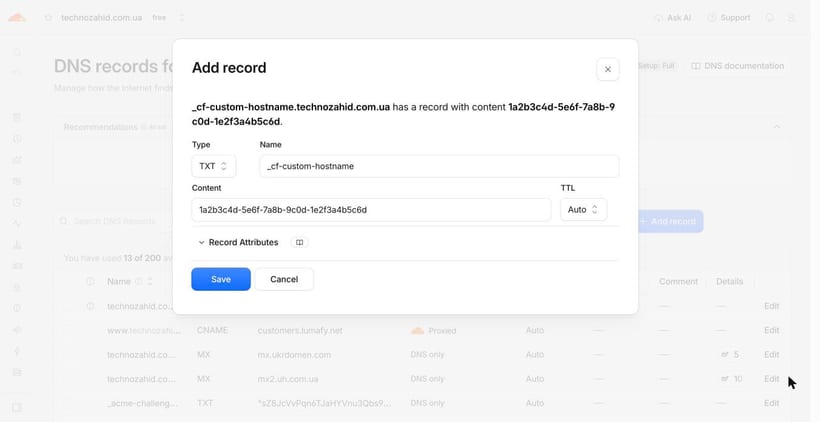
- Click Add record.
- Type:
TXT. - Name: the name from the table, for example
_cf-custom-hostname. Cloudflare adds your domain at the end itself, so both the short and the full name work. - Content: the value from the table. Copy all of it, with no spaces at the start or the end.
- TTL:
Auto. Click Save.
Several records can share a name, for example two _acme-challenge records. That is fine: add each one separately.
Step 3. Point the domain to Lumafy
First check the list for records named after your domain (Cloudflare shows the domain itself or @) and named www, of type A, AAAA or CNAME. They lead to the old site: note their values (or take a screenshot) and delete them. Otherwise the new CNAME record cannot be added.
Leave the MX records, TXT with v=spf1, DKIM and _dmarc, and other subdomains alone. They are your e-mail and other services and keep working as before.
Then add two records:
| Type | Name | Target | Proxy status |
|---|---|---|---|
| CNAME | @ | customers.lumafy.net | Proxied (orange cloud) |
| CNAME | www | customers.lumafy.net | Proxied (orange cloud) |
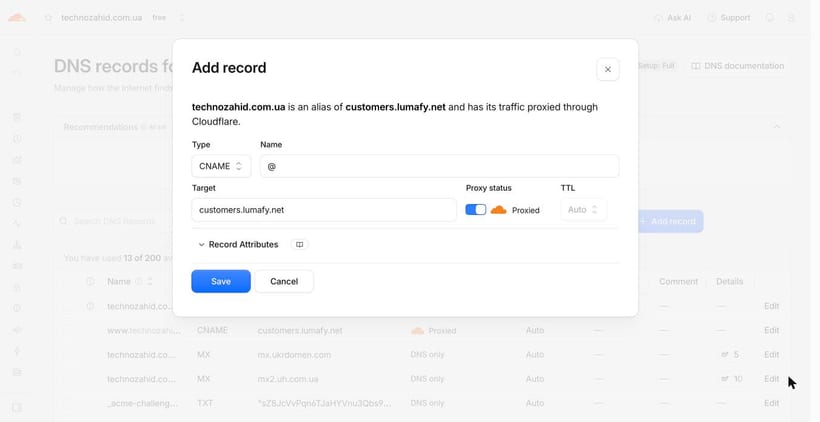
Then: check the domain's settings
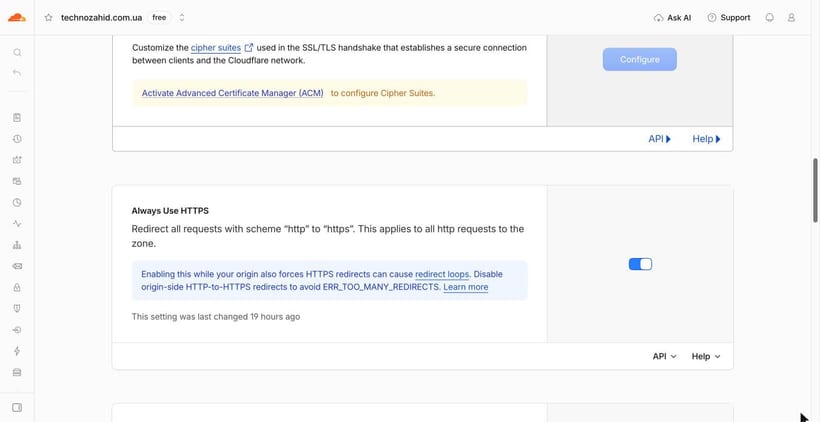
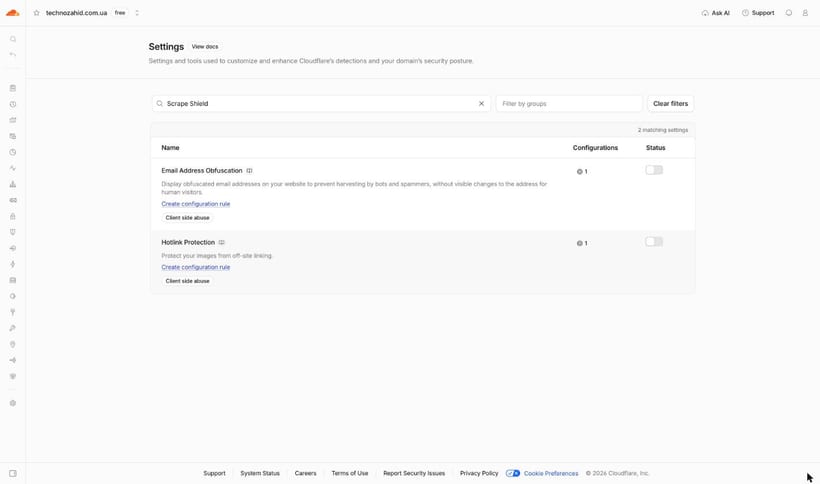
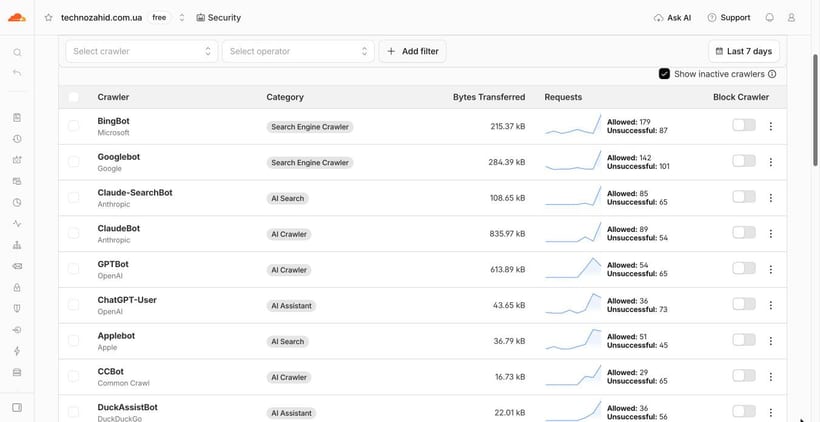
This is needed whichever way you chose: a DNS key cannot change these settings. Cloudflare applies them before a request reaches the site, so they can break what we built into the site. Cloudflare sometimes renames menu items: if you cannot find one, type its name into the search at the top of the dashboard.
SSL/TLS → Edge Certificates → Always Use HTTPS: on. Then everyone opens the site over HTTPS only.
Security → Settings → Email Address Obfuscation: off. Otherwise Cloudflare rewrites e-mail links and adds its own script, which the site's protection blocks.
AI Crawl Control → Security: if you want ChatGPT, Claude, Perplexity and other AI assistants to read your site and recommend you, the Block Crawler switches next to GPTBot, ClaudeBot, ChatGPT-User and the other bots should be off. If Security → Settings has Block AI bots or Managed robots.txt, turn those off too. This is your decision: we will explain what it changes.
Caching → Configuration → Purge Everything: click it if the domain had another site before, so nobody sees old pages from the cache.
Let us know
Tell us by Telegram or e-mail that the records are in (or send the key). We check the certificates and the site and write back when everything works. Usually 5–30 minutes.
In the first minutes the site may show error 403 or 1014. That is normal: Cloudflare is still spreading the new records, wait a few minutes.
What does not change
- E-mail on your domain works as before: we do not touch the mail records.
- The domain and the Cloudflare account stay yours. We need no access to the account, and a DNS key, if you gave us one, is yours to delete.
- Other subdomains (for example
shop.orapi.) work as before.
How to undo it
Delete the two CNAME records (@ and www to customers.lumafy.net) and bring back the old records you noted. The TXT records can stay: they do not get in the way of anything.
If your domain is not on Cloudflare yet
If you bought the domain from another registrar and it is not on Cloudflare yet, add it first. It is free.
- In Cloudflare, click Add a domain, enter the domain and choose the Free plan.
- Cloudflare copies the existing DNS records. If e-mail already works on this domain, check that the mail records (MX and TXT with
v=spf1) are in the list. - Cloudflare shows two nameservers. Enter them in the domain settings at your registrar instead of the old ones.
- Wait for the e-mail from Cloudflare or the Active status next to the domain. Usually within an hour, sometimes up to a day.